Home |
About |
Software |
Hardware |
Systems
Specials |
Graphics |
Money |
Info |
Contact Us
Download Demo Software
Everyone E-Mails us with the same request. More Info...
So here it is. Enough information to choke a horse.
| |||||||||||||||||||||||
Note: All measurements are in U.S. feet & inches, weights in U.S. ounces & pounds, values in U.S. dollars.
Disclaimer:
All specifications in this document are typical values, and do not take into account every possibility.
Some of the following descriptions include opinions of NML that have been formed over years of experience, but nonetheless may be the subject of debate. Some descriptions have been simplified for comprehension.
So There.
Diode. Red (special types may be green). Typical power 1-10mw, with the most popular being 3mw. Hand held "pointer" to several inch long "module", runs off of batteries or 5vdc, weighs several ounces. Cost, $30- $1000 new, $20-$700 used.
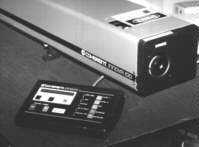
He-Ne. Red (special types may be yellow or green). Typical power 2-20mw, with the most popular being 5mw. 1-2 ft. long, 2" cylinder, with a small power supply that runs off of 110-240 vac @ less than 1 amp, weighs 1-10 pounds. Cost, $200- $2000 new, $50-$800 used.
Air cooled Argon. Blue/Green. Typical power 30-500mw, with the most popular being 60mw. 1-2 ft. long , 8" square, with similar sized power supply 110-240 vac @ 20-30 amps, weighs 30-60 pounds. Cost $2000-$8,000 new, $800-$3000 used.
Water cooled Argon. Blue/Green. Typical power 2W to 30W, with the most popular being 5W. 3-6 ft. long by 8" square, with large power supply 220-440 vac 3 phase @ 40-60 amps, weighs 80-400 pounds. Cost $6000-$70,000 new, $3000-$30,000 used.
Water cooled Krypton. Red (wideband, yellow). Typical power 1W to 7W, with the most popular being 1.5W. 3-6 ft. long by 8" square, with large power supply 220-440 vac 3 phase @ 40-60 amps, weighs 80-400 pounds. Cost $6000-$70,000 new, $3000-$30,000 used.
White Light. Typical power, 60mw air-cooled, 1-8W water-cooled, with the most popular being 3W water-cooled. 3-6 ft. long , 8" square, with large power supply 220 vac 3 phase @ 40-60 amps, weighs 80-200 pounds. Cost $7000-$40,000 new, $5000-$12,000 used.
Yag. Green. Typical power 20mw to 60W, with the most popular being 40W. 2-3 ft. cube, including power supply 220 vac 3 phase @ 10-30 amps, weighs 200-400 pounds. Cost $50,000-$100,000 new, $30,000-$50,000 used, $20,000-$40,000 converted medical units.
TIPS:
Be sure to check the power socket with a voltmeter to make sure your power source matches your laser power supply specs, before powering up. If the unit is 3 phase, check to see if the power supply is delta or wie. With delta power, one of the phases will measure twice as much as the other two, referenced to ground. This double voltage leg is sometimes called the "stinger" leg, and will blow up many laser power supplies.
Never disable the water flow interlock. You may need to "kink" the output hose slightly (to cause back pressure), in order to activate some flow sensors. Cool down the laser at low power before shutting off the fan or water flow.
Keep the optics clean. Use methyl alcohol or acetone and a very clean, non abrasive paper. Do not rub, but rather drag the wet paper over the optics, then immediately dry or blow with a can of compressed air. When replacing or cleaning optics, do only one at a time. Fire the laser and realign before going on to the next one. Try not to loose the beam completely when adjusting.
Flat optical breadboard
A large plate up to 4' x 6' in size is used to mount all components, including the laser. New technology such as PCAOM's and other devices have reduced the need for such large beam table areas. With it's large size and weight, this type of table is mostly suited for permanent installations.
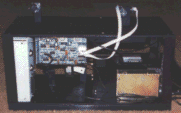
Upper/Lower configuration
Two optical breadboards can be stacked on top of each other, spaced apart by support beams to make a box. This allows more equipment to be packed into a smaller area, and also acts as an enclosure to protect the parts. Typically the laser (or at least the front part of the laser) is mounted on the bottom plate, along with color modulation and electronic components, power supplies, etc. The beam is bounced up to the top through one of the 1/4-20 holes, and the top is left free for any desired optical configuration. This type of system is easily transported because the laser can be mounted in such a way as to be easily removable.
Drill on demand
The expense of the classic beamtable cannot be overlooked. With a hole every square inch, a one foot square breadboard has 144 holes. Even medium sized breadboards can have thousands of holes. Drilling and tapping 1/4 inch aluminum is not cheap. In a production environment, there will certainly be taps broken and breadboards ruined, which must be factored into the per-unit cost. Some manufacturers drill only the holes that are needed, and drill and tap extra holes when a change has to be made. Metal chips from drilling the hole can get into the laser or electronics, so partial disassembly is usually required.
TIPS:
Use solid, repeatable mounts in all locations, bolted down firmly. Make sure weight is distributed evenly, so moving the unit will not cause flexing of the breadboard and subsequent misalignment.
Keep beam paths as short as possible. The longer the throw to the next optical element, the easier it is to put the system out of alignment. Use as few mirrors as possible, because each mirror bounce will add a few percent loss, and also causes the beam to expand slightly.
If your system does not have a permanent output mask (safety beam block), make a temporary one out of "black wrap" aluminum foil. Purposely scan where the audience would be, and adjust the beam block until it masks the audience area.
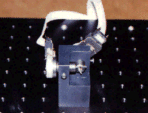
A galvo (scanner) is basically a high speed motor that rotates only slightly from side to side, instead of spinning continuously in one direction. With a mirror attached, a galvo can deflect the laser beam very accurately. The main determining factor for a galvo is speed, which is measured in thousands of points per second, or KPPS. Faster galvos have less flicker.
General Scanning G138, G120, 124
GS is the inventor of the modern day mass produced high speed galvo. The G120 position detecting galvo used feedback, which allowed the projection of modern day laser graphics without overshoot. Although not specifically designed for laser lightshow use, the G120 quickly became the standard of the industry. Their patents on moving-iron armatures, torsion bar centering suspension, and capacitive feedback technology, held the rest of the industry at bay for years. Newer versions have increased speed and deflection. These galvos run at the standard 12K ILDA speed, although new amplifier designs pump enough current into them to allow 24K or higher speeds.
The G124 galvo is similar to the wide angle G138 without the feedback section. Although this would typically result in massive overshoot, recently developed amplifiers allow them to operate at near 12K performance. The 124 galvos and "accelerator" amps are very popular because of their low cost, medium performance, and almost indestructible characteristics.
Cambridge 6800HP.
Cambridge is a medium sized, hi-tech company which started making a line galvos specifically for the laser lightshow industry. The 6800HP (H stands for high performance, P for dual position detector) is characterized by very high speeds of up to 40k points per second or more, and a wide output swing of as much as 80 degrees.
The design uses optical feedback for stability, and no torsion bar for reliability and low power consumption.
The 6800HP and the new 6210 may have the fastest and widest angle output of any electro magnetic galvo currently mass produced.
Laserworks , MFE, and others.
Some other manufacturers have made similar products at competitive prices. In some cases there is a desirable price/performance trade-off or unique mechanical/electronic feature.
TIPS:
If you feel the need to rotate the mirror/armature assembly with your fingers, do so gently. Most non-Cambridge style galvos have a torsion bar suspension that will easily break. Keep mirrors as small as possible, and the galvo mount as sturdy as possible. Never plug in or unplug a galvo when the galvo amp is on.
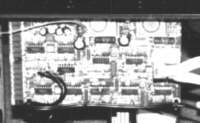
A galvo amp is similar to a Hi-Fi stereo amplifier which is DC coupled from input to output, and uses a special feedback circuit to determine the galvo mirror position. This feedback allows the amp to give the galvo a "kick in the pants" in the opposite direction, to help slam on the brakes when the galvo starts to overshoot. Many amps have balanced inputs which help cancel hum and other interference when using long cable runs. All galvo amps have a servo feedback and dampening adjustment. The more servo feedback you tune in, the more current is pumped into the galvo, and the faster it will go.
G120 style
Manufactured by many different companies, the GS style galvo amp was the standard of the industry for years. Recent amp improvements allow faster scanning speeds than previously thought possible using this type of galvo.
Cambridge style
Also manufactured by several different vendors, the Cambridge amp uses optical feedback, which is inherently more accurate and stable than most other feedback methods. The Cambridge amp has a built-in protection circuit called a coil temperature calculator, which basically monitors the instantaneous power dissipation of the galvo, and reduces the gain if an offending input signal is applied.
124 "accelerator"
This amp can fake a non-feedback galvo into acting like a feedback galvo by sensing inductive kickback (reverse EMF). The amp automatically corrects for overshoot on a micosecond basis.
Others
Most other galvos use a somewhat different type amp simply because the galvo itself is different, and therefore has different drive and feedback characteristics.
Galvo mirrors should be kept as small as possible to reduce mass and increase speed. However, you may want to consider using two "Y" mirrors on your X/Y set in order to avoid different amplifier tuning between channels.
You can tune your galvo amp without an oscilloscope by using your controller software to project a low speed square consisting of 4 dots. Slowly turn up the servo gain (not to be confused with the input gain, or size) until the beam overshoots on the corners, and get rid of the overshoot with the dampening. Increase the servo gain to get more overshoot, and get rid of it with the dampening again. Repeat until the image isn't stable any more, then back off. If you are tuning a Cambridge style amp, use the low frequency dampening first, then when the corners start to overshoot and undershoot at the same time, adjust the low frequency dampening to get equal amounts of overshoot and undershoot, then get rid of it with the high frequency dampening adjustment before continuing.
For safety: During the tuning procedure, be ready to turn off power if the galvos start to squeal. Only use as much input gain as necessary to get the job done. Only use the factory rated galvo fuse, typically 2 amps. Never plug in or unplug a galvo when the galvo amp is on. Check your galvos and amps every once in a while, to make sure they are not getting too hot.
Blanking is the ability to turn the beam on and off at a high rate of speed. Most complex graphic images require blanking, in order to eliminate the "retrace" lines that would otherwise be visible. There are several different ways to blank
Flag blanking
The simplest method is to have a galvo move a beam block into the beam path. This method is very slow, and usually causes "tails" on the beam as it is being blanked. Flag blanking is usually used only in economy situations.
Mirror/pinhole blanking
A faster method is to have the beam bounce off of a galvo mirror, and travel some distance (a few inches) to a pinhole in a beam block. A slight movement of the galvo causes the beam to move out of the pinhole and to hit the beam block. The distance between the galvo acts as an optical lever, speeding up the blanking tremendously.
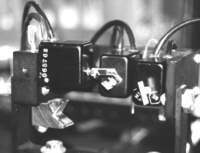
Retro reflector blanking
The best of all mechanical blanking mechanisms. The beam bounces from a mirror to a retro reflector and back to the same mirror again, before entering the X-Y set. The long throw acts as an optical lever, and the retro section (as pictured above) cancels out the "hooks" on the end of the blanking tails that would otherwise be visible.
A/O blanking
Acousto optic blanking with an electronic crystal is the fastest method possible. The beam passes through the crystal and is diffracted when an RF signal is applied by the driver. Standard A/O blanking is only 50 to 80% efficient, so be prepared for some power loss.
Use a high quality feedback galvo for blanking if possible, or the overshoot will cause the beam to "stutter". If you are using a pinhole, make it as big as possible without getting performance degradation.

Mirrors, splitters and dichros are all basically the same type of optical element, except for the percentage and wavelength of light they reflect.
Mirrors
For high power laser lightshow purposes, dielectric mirrors are normally used. Dielectric mirrors have many layers of material vacuum deposited on them, in order to reflect the desired band of wavelengths (colors). In most cases, these mirrors are optimized for Argon, and will take 10, 20, or even 30 watts of laser power. If many more layers of material are deposited, the mirror will reflect red as well as blue and green, in which case it is called a white-light mirror (typically much more expensive). For low power ( less than one watt) purposes, you can use aluminized mirrors which are very cheap, and are by nature white-light reflective.
Splitters
A splitter is a partially mirrored piece of glass, that can be coated to reflect virtually any percentage, and let the rest pass through. The most common values are 50% and 33%.
Dichros
Sometimes it is desirable to reflect certain colors, and let the other colors pass through. A dichro can be used as either a color selective mirror, or a filter. That is, the desired band such as blue and green can be passed through, and the remaining red can be reflected. Conversely, the same end result can be accomplished by reflecting the blue and green, then passing the red. These two categories of dichros are referred to as RGB (red, green, blue) and CMY (cyan, magenta, yellow). Color blending and mixing can therefore be additive or subtractive.
Dichros can also be used to combine beams of different colors. For instance, a "reflect red" dichro can be placed in front of an Argon laser at a 45 degree angle, and a red Krypton or HeNe beam can be aimed at the same spot on the dichro. The blue/green passes through, and the red is reflected in the same direction as the blue/green, combining the beams into white light. The 45 degree dichro is "tweaked" with a MM1 mirror positioner, until the two "far" beam spots (some distance away), are on top of each other. In a combining setup, a small percentage of the light is reflected off of the back of the dichro and lost.
TIPS:
For cleaning, use methyl alcohol or acetone and a very clean, non abrasive paper. Do not rub, but rather drag the wet paper over the optics, then immediately dry or blow with a can of compressed air.
Do not use superglue to mount glass elements. Superglue causes a haze to form which may not be removable. Superglue contracts when it dries, causing the mirror to bend, and causing any beam that hits it to expand. Most laserists use five minute epoxy for permanent installations, or silicone sealant for removability.
The PCAOM has changed the way we do color modulation in the laser lightshow industry. The old way was to flip dichros on the end of actuator arms (slow), or use three A/O's with a beam blending setup (a nightmare to align). The PCAOM can instantaneously change beam color and intensity, with minimum setup and alignment hassle.
Color selection
There are typically eight channels of selectable wavelengths (color) in a PCAOM. The RF driver puts out a different frequency for each channel, and the crystal reacts to each frequency by diffracting a different wavelength. The output of each channel is proportional to the DC input level, so you can select any of eight colors (or combination of colors) and adjust the brightness of each. There are several ways to change colors with a PCAOM.
(a) RGB. Tie all of the red channels together, all of the green channels together, and all of the blue channels together. You can adjust the brightness level of each of the three groups of channels, to blend the colors together. This gives dozens, hundreds, or even thousands of color combinations, but many of the blended colors lack the inherent eye-catching brilliance of pure laser colors. Since you are attenuating (cutting down the brightness) of the outputs in order to get a certain color, this method can be somewhat inefficient.
(b) Color Combining. The channels are turned off and on in combinations. For instance, bright red combined with dark blue, to get a rich purple color. This method gives brilliant colors, and does not attenuate any of the inputs, so it is inherently efficient. The drawback is that there are only a limited number of color combinations available.
(c) Individual wavelength modulation. Some systems allow complete analog control of all inputs. This is similar to the RGB system, but allows millions of colors.
Efficiency
Although the typical efficiency of a high performance PCAOM is about 85%, this only applies to each of the eight colors that can be selected. There may be a dozen or more "lines" of color in the spectrum analysis of the beam of a given laser. This means that these other colors are being thrown away, even when all of the PCAOM channels are full on. Admittedly, these wavelengths are of little use, but nonetheless add up to a percentage of the lasers output. The real world efficiency figure ends up being more like 70-75%. The remaining 25% or so is in the "waste" (throw away) beam output, but can be used for other purposes on the projector, such as a simultaneous nebula effect.
The following is the "quick" alignment procedure for the popular NEOS PCAOM
(1) Turn down the laser power to less than one watt, and adjust the crystal so that it is vertical (not tilted).
(2) Center the beam in the input window, and turn up the laser power to the desired level.
(3) Project a known color, and adjust the brag angle by slowly tilting the RF connector away from the laser.
(4) The selected color will be deflected out of the main beam, when the angle is correct (5-10 degrees).
(5) There will be more than one angle where the selected color is visible. Pick the brightest one.
TIPS:
Be very careful when making the electronic connections. When purchasing, pay the extra to get input/output windows, so as to avoid damage to the raw crystal itself. If you don't have windows, be careful to follow the factory cleaning instructions, and stay away from the tiny delicate gold wires on the inside.
Sometimes you can't get the projector where you want it. The good news is that a fiber optic "light pipe" can get the beam to virtually any desired location, even hundreds of feet away. The bad news is that you will have to put up with at least some power loss and beam degradation.
Fiber
In general, the best fiber to use is step index silica/silica, although it is possible to get good performance with gradient index plastic fiber. The connectors on the end can be several different types, but SMA seems to be prevalent due to it's low cost and availability. Use 50 micron for graphics and 100 micron for high power beams where divergence is not as important. Divergence is the rate at which the diameter of a beam gets bigger with distance.
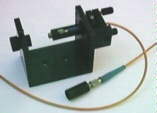
Fiber input couplers
The most important part of a fiber system is the input coupler. The beam must be focused down to enter the exact center "core" of the fiber for best performance. An input coupler has a method of moving the focal point of the beam onto the end of the fiber in all three directions, X, Y, and Z.
Fiber output couplers
The output coupler is almost a mirror image of the input coupler. Adjusting the X and Y axis is either not as important, or not important at all, depending who you talk to. The output coupler usually consists of a simple single lens to refocus the output of the fiber into a beam again, adjustable in the Z axis only. The output beam diameter is usually 1/4 to 1/2 inch in diameter, and usually diverges considerably faster than the original raw beam.
Collimators
Also known as beam expanders, a collimator will make the laser beam smaller at a distance (far dot size), at the expense of having a fatter beam coming out of the collimator (near dot size). If the near dot size is too big, it makes the beam hard to manage because of the need for larger galvo mirrors etc.
TIPS:
It is important to keep the fiber ends and lenses clean, especially on the input coupler end. Specifically, a single speck of dust on the tip of the input fiber will turn into black carbon as soon as it is hit with several watts of focused laser power. At that point it will start to absorb power and generate heat, destroying the end of the fiber.
When adjusting the input coupler, turn the laser power down to less than one watt to avoid burning the end. Aim the raw output end of your fiber at the wall or similar surface several feet away, and adjust the input coupler for best beam quality. First adjust the X and Y, then the Z for maximum brightness. Repeat the X, Y, and Z adjustment for fine tuning. Attach the output coupler and adjust the focus of the output coupler for the smallest far dot size. It is now safe to advance the laser power.
Actuators are used to change the direction of the beam on a beam table, and reroute it to a different effect. An actuator must be continuous duty, be capable of moving considerable mass, and do it at a fairly high rate of speed. In many respects, it is a slow galvo.
General Scanning GM20
The classic laser lightshow actuator. Rugged, very repeatable, requires about 12-18 vdc at about 1 amp. Capable of swinging in both directions.
MFE
A GM20 clone at lower price, more than acceptable performance, and slightly larger in size. Many people have recommended this as the only true alternative to the GM20.
Rotory Solenoid
Much cheaper ($20-30 vs. $100-150). Not very repeatable, the rotory solenoid will come to a slightly different resting place every time. Much slower. For some applications, this is OK. A good cheap alternative if you can stand the noise.
Amps
Amplifiers for actuators can be a simple TIP 120 transistor with a 2.2k resistor in the base, or they can approach galvo amp complexity, depending on the speed required. Prices range from as little as $10 per channel to over $80 per channel.
Unipolar vs. Bipolar
Most actuators, with the exception of rotory solenoids, can be driven in both directions (plus and minus 10 or 20 degrees) by reversing the polarity of the drive signal. A unipolar driver moves an actuator to a given position, and then lets it spring back to it's resting position.
TIPS:
Make sure your actuator is capable of continuous duty, by making sure it doesn't get to hot after 10-20 minutes of "constant on" operation.
Count the total number of actuators that can be on at one time, and make sure your power supply can handle it. Usually, one or two actuators are on at a time, requiring 2-3 amps total.

There are many different effects that can be achieved with simple optical elements. There are probably hundreds of different effects that can be achieved by sticking something into the beam. Here are a couple of the most common.
Nebula effect
The Nebula effect, or Astro cloud, is one of the easiest effects to produce. Take a piece of plastic or glass and smear some clear silicone on it. Let it dry, and put a beam through it. If you want to get really fancy, put your newly created effect on a fractional RPM motor (1 RPM to 1/4 RPM). For high power applications, use "shower glass". Try different types of glass for different sized effects at different distances, and put the beam through a prism (or use the "waste beam" of a PCAOM) for color effect. Use an actuator to steer the beam into the effect.
Diffraction gratings
Diffraction gratings make a fan or burst of beams when interacting with a beam. They can be made out of scribed plastic or glass, grooved metal, or a thin plastic holographic simulation of one of the above. A "line" or "fan" grating produces a beam pattern similar to that at the top of this page. Put a sheet of this grating over a bounce mirror to throw the pattern back in the opposite direction. A "burst" or "X-Y" grating produces a beam pattern of dozens or even hundreds of beams going in all directions. A burst style grating can be placed in front of a set of galvos, and cause the projected image to multiply. The "Machida" diffraction grating (named after the company that manufactures it) is made of fiber optic strands closely butted up against each other side to side, and creates a very wide angle, full color, closely spaced fan of beams. Somewhat expensive, but a very dramatic effect.
HOE
The Holographic Optical Element can simulate just about anything that can be achieved in nature, plus some that can't. Various adaptations of this technology can produce spirals and even company logos by simply passing a beam through the holographic film.
3D
A very plausible 3D image can be made by projecting two slightly different images in different colors or polarizations from two sets of galvos. The viewer wears glasses with different colors or polarization planes in each eye, to allow different images to be viewed by the right and left eyes. Other types of glasses allow different colored objects to be perceived as different depths.
TIPS:
Be very careful when using any optical effect. Unexpected reflections and out of alignment actuators can cause permanent eye damage. Keep the power in the low milliwatt levels until you get it right.
Home |
About |
Software |
Hardware |
Systems
Specials |
Graphics |
Money |
Info |
Contact Us
Download Demo Software